Diy Tube & Wire Cutting Jig for Jewelry Making
How to Make Perfect Cuts With Circular and Miter Saws
Don't become an emergency room statistic. Master these cuts and do them safely.
 Family Handyman
Cut cleaner and safer with your miter saw and circular saw. Take the worry out of making tough cuts like plunge cuts and miter cuts on wide boards, short boards and even tiny boards.
You might also like: TBD
- Time
- Complexity
- Cost
- An hour or less
- Intermediate
- $51–100
Tip 1: Let Cutoffs Drop Free to Avoid Binding the Blade

Cross-cutting a long board
Support long cutoffs by stacking boards and separating them with strips of wood as shown. Make sure the end of the cutoff is free to drop.
Cutting the end off a board is usually simple. The short cutoff end simply falls away. But cutting a long board in half is different. You can hold one end, but the other must be free to drop or the blade will bind. The trick is to allow the cutoff end to drop slightly, but not so much that it completely snaps off before the cut is complete. One method is to support the board with strips of wood as shown here. You can also support the board continuously by stacking it on an equal-length sacrificial board. Set your blade to cut about 1/4 in. deeper than the wood's thickness. Hold or clamp the keeper side and allow the other side to move freely.
Tip 2: Clamp Your Work for Precise Bevel Cuts
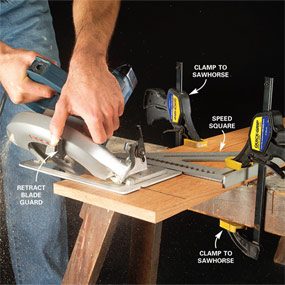
Miter cut on a wide board
Clamp your workpiece for bevel cuts. Then retract the blade guard to start the bevel cut. Release it as soon as the blade is fully engaged in the wood.
You can make crisp, accurate bevel or miter cuts with a circular saw but it's tricky. The blade guard can stick, making it tough to get started. And because the blade is angled, it's more difficult to follow a line accurately without twisting the saw and possibly binding the blade.
Two things will help you get a good bevel cut safely. The first is to clamp the board you're cutting. Clamping allows you to use one hand to lift the blade guard out of the way until the bevel cut is started. The second is to use a straightedge guide, like the giant Speed square shown. It allows you to concentrate on moving the saw steadily forward without having to worry about following the line. If possible, cut with the wider part of the bed on the "keeper" side of the board for better control and more accurate bevels. Near the end of the bevel cut, concentrate on a straight-ahead follow-through.
Safety Tip for Circular Saws
Your circular saw is one of the most dangerous tools in the shop. Accidents happen quickly and without warning and injuries are usually severe. Binding the blade in a cut is probably the most common and scariest mistake because the saw blade will jump up and run back toward you. It usually happens when you're cutting a long board or large sheet of plywood in half without proper support. To avoid it, make sure the cutoff piece is free to drop or move away from the blade. This will eliminate any chance of binding and make all of your cuts safer.
Tip 3: Make Plunge Cuts Safely
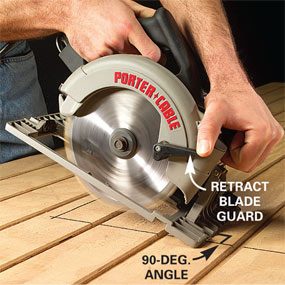
Photo 1: Position the saw
Hold the front edge of your saw bed down firmly. Lift the blade guard with one hand and sight down the blade to align it with your line.
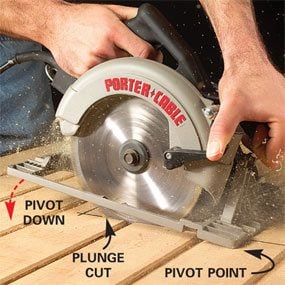
Photo 2: Lower the blade into the wood
Start the saw and let it come up to full speed. Gradually pivot the saw down to start the cut. Hold the saw firmly so it doesn't jump back.
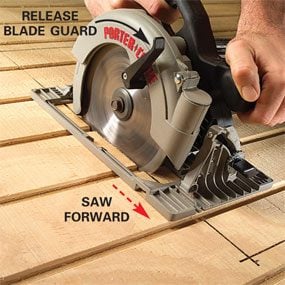
Photo 3: Cut forward
When the saw bed contacts the work surface, release the blade guard and cut forward. Let the blade fully stop before lifting it from the cut.
Plunge cutting is a useful method for starting a cut when you can't start from an edge. One example is cutting a window opening in a sheet of plywood. But if done with poor technique, this cut is dangerous. The saw will kick back and run back toward you. The photos show good technique. Since you can't see what's under the sheet you're cutting, check before you start to be sure the path of the blade is clear. Never back the saw toward you while it's running. And stand to the side, not directly behind the saw. Set the blade to cut about 1/4 in. deeper than the wood thickness.
Tip 4: Replace That Dull Blade

Choppy cut and clean cut
Dull blades cut poorly. A sharp blade cuts cleanly with little effort.
Even the best carpenter can't do good work with a dull blade. And besides making lousy cuts, a dull blade is dangerous. Dull blades can heat up and warp or bind, and they tend to climb out of the cut.
But how do you know if your blade is too dull? Sometimes you can tell just by looking for rounded-over or chipped teeth. But the best indicator is how the blade cuts. If you have to muscle your way through the cut, your blade is dull. A sharp blade will glide through even the toughest wood. Burn marks and rough cuts are other signs of a dull blade.
Many hardware stores offer blade-sharpening services, but I wouldn't waste money sharpening steel blades. High-quality carbide blades are inexpensive and can withstand tons of abuse before they need to be replaced.
A good blade for general circular saw use is a 24-tooth, thin-kerf carbide blade. To get the most from your miter saw, invest in a high quality 60- or 80-tooth carbide blade. Use the cheaper blade that came with your saw for general crosscutting, and reserve the good blade for fine work.
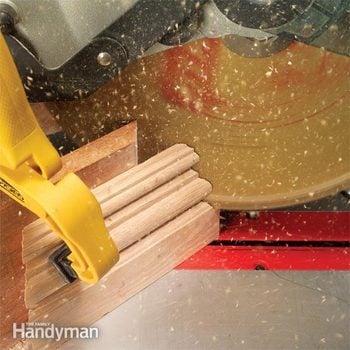
Tip 5: Clamp Short Pieces in the "No Hands" Zone

Photo 1: Mark the danger zone
Draw red lines on the bed and fence of your saw to indicate the "no hands" zone. Draw the lines 7 in. from 10-in. blades and 8 in. from 12-in. blades.

Photo 2: Use clamps on small pieces
Clamp short pieces of molding. Use strong spring clamps or C-clamps.
As a reminder to keep hands well away from the blade, most new miter saws have red lines indicating the "no hands" zone. But what if you need to cut a piece that's shorter than the 7- or 8-in. hands-free area? The best solution is to cut short lengths from longer boards whenever possible (p. 54). However, when you have to trim a short piece of molding, use clamps to hold it in place (Photo 2). The auxiliary fence comes in handy for this task by providing a better clamping surface. You'll get better quality miters because the molding can't slide away from the blade. And you'll be assured safer, hands-free cutting.
Tip 6: Cut Small Pieces Safely
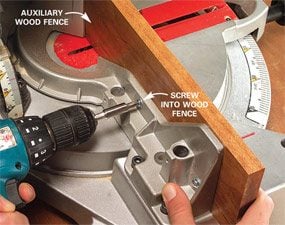
Photo 1: Add a wood fence
Screw an auxiliary fence to your miter box fence to close the gaps. Make sure it's not too tall or it will restrict the depth of cut.

Photo 2: Align the cut
Sight down the blade to align the cut. Let the blade come to full speed before you start the cut.

Photo 3: Let the blade stop
Complete the cut and release the switch. Now here's the key. Let the blade come to a complete stop before you raise it.
Cutting off small pieces is one of the most challenging and dangerous operations on a power miter saw. You're never sure where the piece will end up. It usually becomes a high-speed projectile when it falls into the spinning blade. But there is a way to avoid this problem. The auxiliary fence helps keep the cutoff from falling back, and stopping the blade keeps the teeth from catching it.
Another trick, not shown here, is to stop just before completing the cut. Let the blade stop. Then remove the molding and complete the cut with a utility knife or coping saw.
Required Tools for this Project
Have the necessary tools for this DIY project lined up before you start—you'll save time and frustration.
You'll also use circular saw blades, miter saw blades, a crosscut saw guide.
Similar Projects
Diy Tube & Wire Cutting Jig for Jewelry Making
Source: https://www.familyhandyman.com/project/how-to-make-perfect-cuts-with-circular-and-miter-saws/
0 Response to "Diy Tube & Wire Cutting Jig for Jewelry Making"
Post a Comment