How to Change the Nat Settings on a Router
Network address translation (NAT) is the method for remapping an IP address by another. The information in the IP header is changed in network packets when they are being transmitted over a network traffic routing device.

As NAT changes the IP address information at the packets level, NAT implementations will vary in their behavior in various addressing cases and their effect on network traffic. The specifications of NAT behavior are usually not made available by manufacturers of NAT equipment.
Purpose of NAT:
NAT is done for multiple purposes:
- To add security to the network by keeping the private IP addresses hidden from the Internet.
- To manage IP address as, since the 1980s, systems on networks have been using an IP address standard IPv4. The IP address of a device can be said a device's home address, and in this way, other devices on a network can send and receive messages from that device. Generically xxx.xxx.xxx.xxx is an example of IP address. The upper limit of available IP addresses is about four billion because many IP addresses are reserved for special purposes and devices and so they cannot be used. The upper limit looks like a lot, but, it isn't enough e.g. about 1.8 billion mobile devices were sold in the year 2016. Now add the numbers of smartwatches, business systems devices, televisions, tablets, desktops and laptops sold in that year and in every year since. It is evident rather quickly that there are not enough IP addresses available. NAT is the solution applied by ISPs to receive the IPv4 addresses of the devices on your local network and give them all a single IP address that they can use as a single network. Now your entire network, whether in the home or office, is accessing the internet as if it were a single computer that solves the problem of IP addresses. Also, NAT addresses some security concerns as well.
Whenever a computer in a local network, such as the local area network in your office, sends and receives data to and from the internet, the Network Address Translation (NAT) protocol is employed.
NAT also plays the role of a firewall. The NAT determines the data that can go in and out of your LAN. The router keeps a log of all requests made to it by devices using the NAT.
Possible Complications to Accessing the Internet
It sounds a bit complicated, but the router works through this process with such a speed that the user does not know what's going on because there are no delays. Complications may arise from time to time, if NAT is stricter on the part of the router or ISP, as to what kind of traffic is allowed to flow, from your devices and also in which quantities.
If there are problems using computer applications in your network, the NAT firewall may be the culprit. Devices behind NAT-enabled routers usually do not have end-to-end connectivity and will not be able to participate in some Internet protocols. Or even some of them might have trouble accessing the internet.
Types of NAT
Generally, there are 3 possible settings for the NAT. These settings will mainly determine how good or bad your online experience will be.
-
Open NAT (Type 1)
There are no restrictions in this NAT type, all the devices can send and receive data of all kinds over the internet, and no firewall is to stop or control any kind of traffic. The data will flow without restrictions and the apps of your device will run smoothly. But, your local network is vulnerable to attacks from hackers. Moreover, you will be able to connect to any of the three types. Games Search will require less time and there are minimal chances of getting lags or otherwise kicks during the host migration.
-
Moderate NAT (Type 2)
The NAT allows one or more ports to remain open when setting to moderate. The NAT will also act as a firewall and will only allow connections from a selected group of apps. This is a medium sort of setting of NAT. And user can connect up with users who have Moderate or Open NAT types. Games Search will take some time, but not as much as Strict type. Also, Lags will be less than Strict type.
-
Strict NAT (Type 3)
This type is the strictest of theNAT type. The data entering the local network is severely restricted. Most of the services will have trouble connecting to the internet. This is the default setting of most routers. And the user will be able to connect only with users who have NAT type open. Searching for games will ultimately take more time. And 90% of the time you will be kicked out at a host migration and remember that lags are also possible.
Connectivity Between Different NAT Types
Connectivity of one NAT type with the other is shown by the table below.
| Open | Moderate | Strict | |
| Open | ✓ | ✓ | ✓ |
| Moderate | ✓ | ✓ | |
| Strict | ✓ |
Change Your NAT Type
To Change NAT to "open" from "strict" usually involves port forwarding of specific ports through your router or gateway. Remember that if you're trying to get Open NAT on more than 1 PC / Console on the same network it is not possible. You can have two or more PCs with Moderate NAT but not with NAT type Open.
Moreover, in your router, you may see Cone NAT, Symmetric or Full-Cone NAT, etc. which depends upon your router. You should go for Cone NAT or full Cone NAT but beware of security risks.
There are various solutions to change the NAT type, but enabling Universal Plug and Play (UPnP) is usually regarded as the first step. But before that, you have to know the ports of your games.
Ports of Games:
You can find ports for your game by visiting this link. You will need these ports before moving forward. And if there are not ports mentioned for your game, then google is your best friend. For this guide, we will use ports for Black Ops 3 game.
Method 1: Turn on UPnP via Network Infrastructure.
Ports are the digital channels for your router & used for sorting the incoming and outgoing web traffic. UPnP essentially allows applications to forward ports automatically, avoiding the hassle of manual "port forwarding." Although they often achieve the same result, UPnP allows the application to request a port seamlessly, and you do not have to enter port numbers manually.
UPnP has a long list of security flaws associated with it. And hackers can leverage UPnP vulnerabilities, due to its open nature. So, there could be some security risks when using UPnP. Moreover, the technology of UPnP is not near to standardized, which means that implementations will vary between routers.
The setup process is simple to enable UPnP on the router. Steps will vary between router models, though general guidelines are provided for what to expect. Remember that you will require a static IP address or otherwise for every reconnection between the PC and router you have to repeat this process. This is the way of forcing UPnP on the router to open the ports required by the game.
- Double click your icon "My computer". The window will pop up. At the left bottom of your screen, you will see an option called network. Click it.
- Right-click on Network Infrastructure and click properties. If Network Infrastructure is not shown, move to the next step.
- Now, simply click on settings.

Settings - After that Click on the "Add" button.
- A new window will appear. Click add at the bottom of the window.

IP Address and Ports - For one more time, a new window will appear. Then do the following: In the first tab (name of service) type Name as per your liking, in the second tab put your IPV4 address (To find IP address, open command prompt and then type ipconfig.), in the third tab put 28950 and don't forget to put UDP, and in the last tab you put again 28950. Then click ok. (The ports for Black Ops 3)
- One more time click add. At the 1st tab, type MW3 OPEN NAT or whatever you like, at the 2nd tab type your IP address, at the third tab type 3074 and don't forget to put UDP and in the last tab, you type again 3074.
- When you are done with the port(s) simply hit OK

Services Added - Now hit APPLY then OK

Apply Changes - Now close all the windows you opened, launch your game and hopefully, you should have an OPEN NAT type.
- Launch your game. Your NAT type should be opened.
Again I remind you that you have to do the procedure above every time you reboot your router or restarting every active connection.
The problem is that this solution is temporary. Whenever you restart your router/modem everything is reset. But it will take you just 2-3 minutes to open NAT by adopting the above-said procedure.
Method 2: Use of The Configuration File
This is the method by which you will permanently fix the problem.
- Log in, on your router's page using one of the browsers.
- Go to your router's configuration page.
- Find the option called "Save or Restore Configuration". Click it.
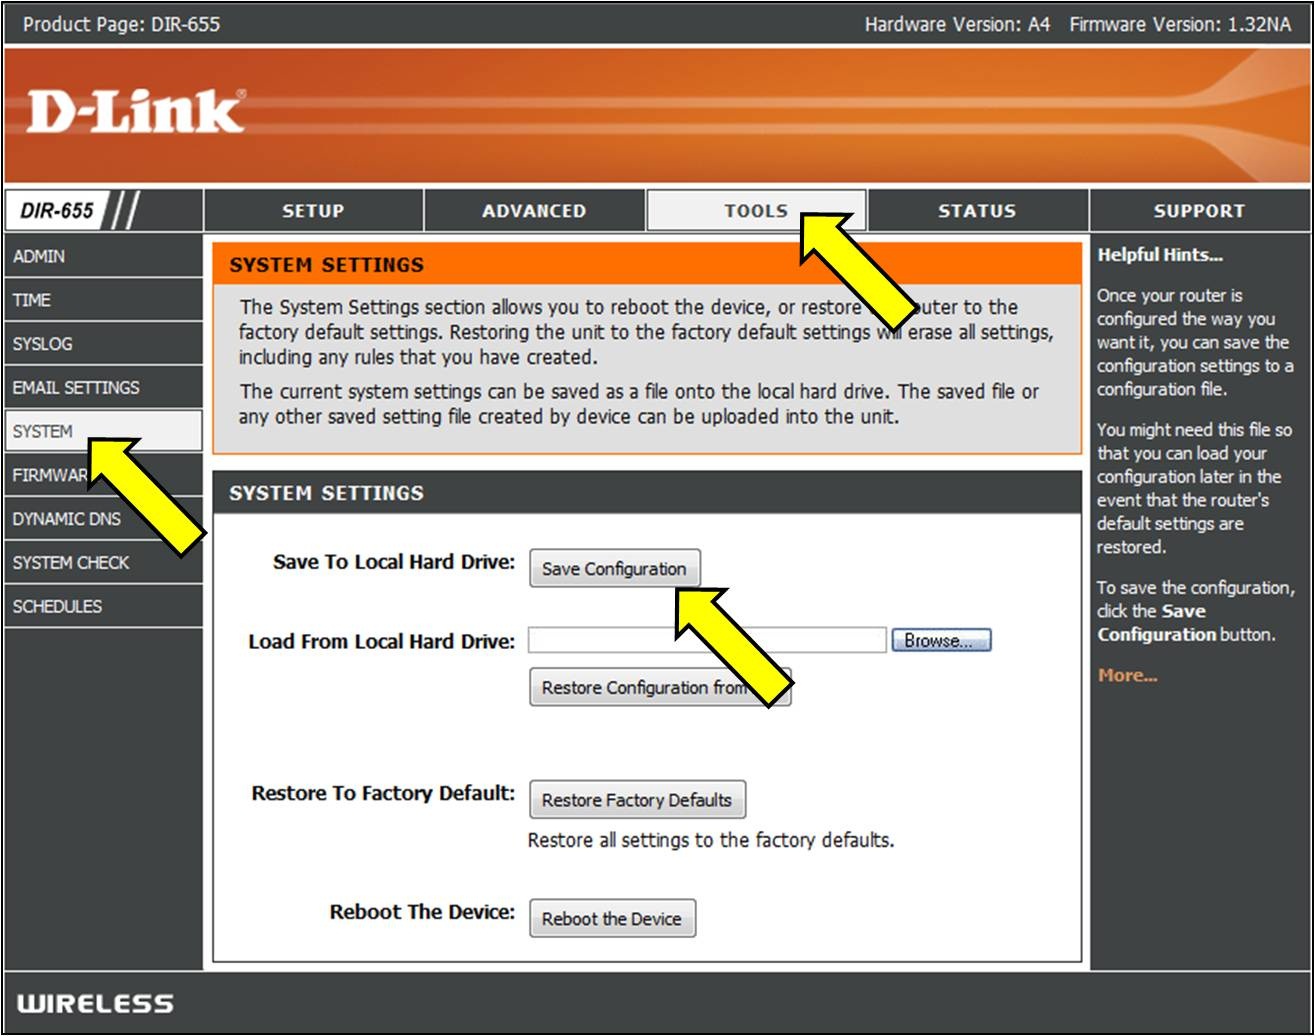
Save or Restore Configuration - A new page will load up. Use the option "back up configuration now."
- Wait a couple of seconds and a window will pop up. Then click, save the file, then ok.
- Make 2 copies of this file so if something goes wrong we will have a backup.
- Open the file.
- Hit down Ctrl + F and write [connection.ini]
- After finding that look for the last bind.
- Under the last bind type or paste (do not forget to change ports according to your game) this:
"bind application=CONE(UDP) port=3074-3075"
then under the last one type or paste (do not forget to change ports according to your game) this
"bind application=CONE(UDP) port=3478-3479"
then under the last one for one more time type or paste (do not forget to change ports according to your game) this
"bind application=CONE(UDP) port=3658
"
(The ports used are of Black Ops 3) - After that save the file (Probably the file is opened with the notepad.)
- Again go to the router's page at the configuration tab where you have been before.
- Now browse to the new configuration file by using the option.
- After that click "Restore Configuration Now". Be patient and wait.
- Close your router's page and reboot your router. When you launch your game NAT should be Open.
Method 3: UPNP via Router
- Do WINDOWS + R
- Type cmd and hit enter
- Type ipconfig and hit enter
- Look for the default gateway and write/copy it.
- Type the above-found address into your web browser and go to the router settings menu
- Try to find WAN, Similar "Internet" menu or "Local"
- Find a button for UPnP and turn it on, then click the save/apply button and if there is not UPnP button, then move to the port forwarding section of this article.
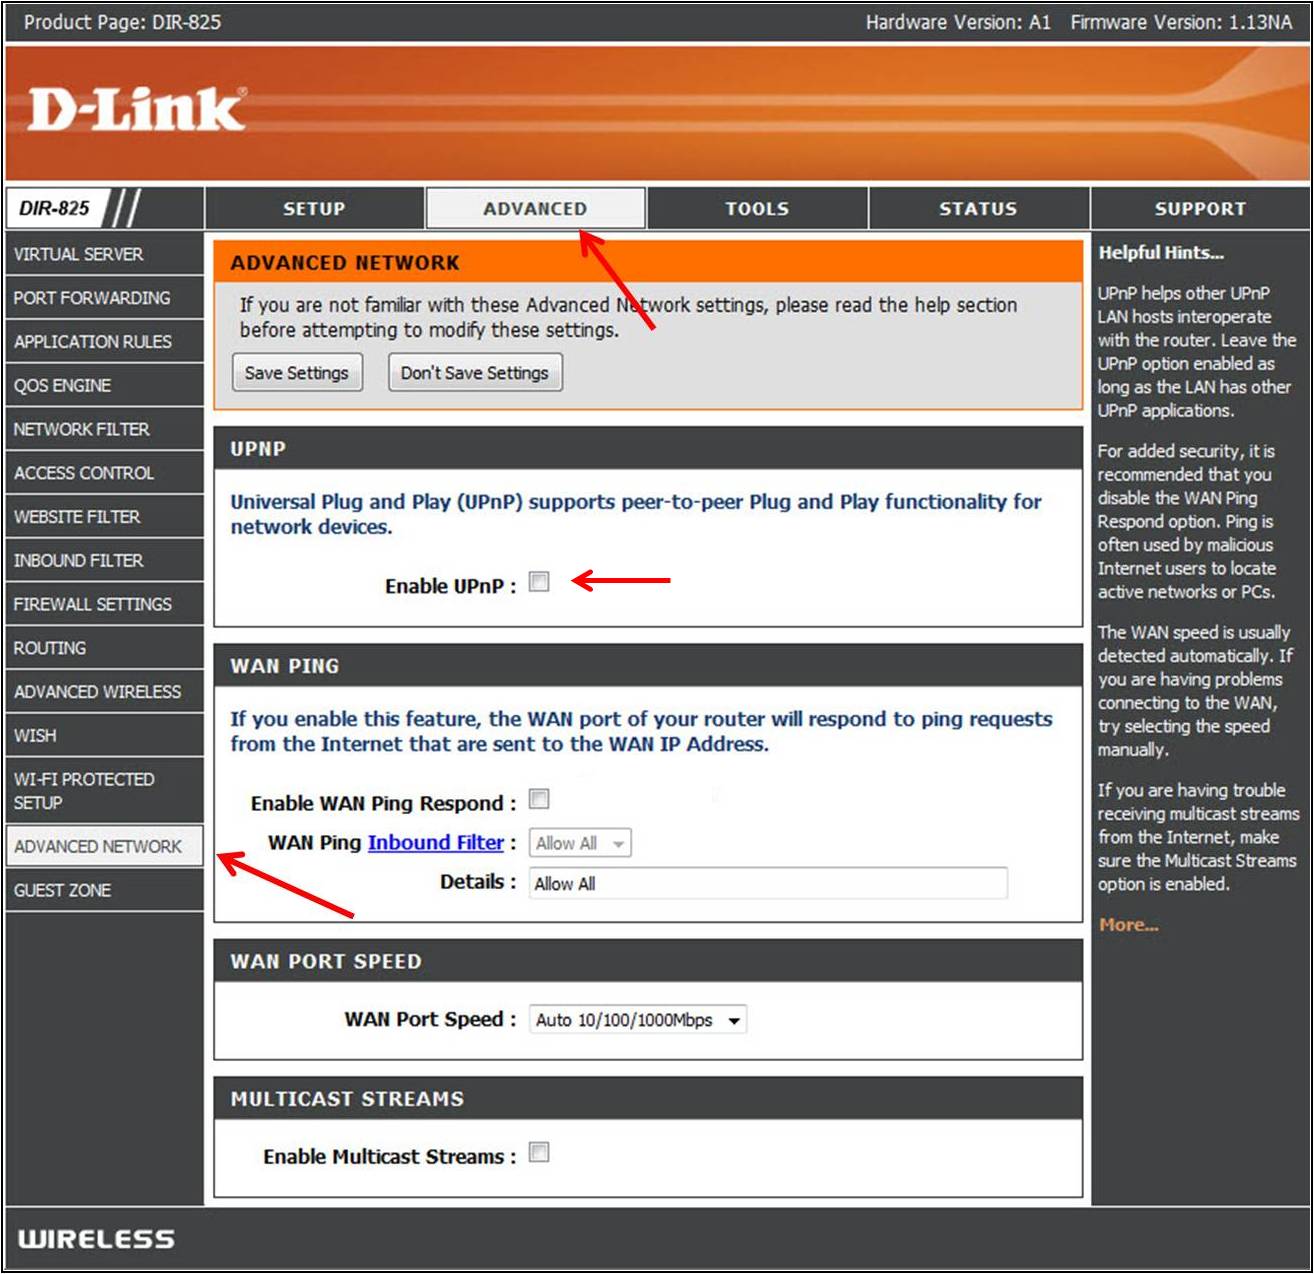
Enable UPnP - Restart your router
And see if it has started to work. If not, move forward
Method 4: Turn on Network Discovery in Windows
- Open the Start Menu
- Open Settings
- Click Network & Internet
- Click Sharing options.
- Expand the network profile assigned to the network connection.
- In the Section of Network discover, select the "Turn on network discovery". Moreover, check the box "Turn on automatic setup of network-connected devices."
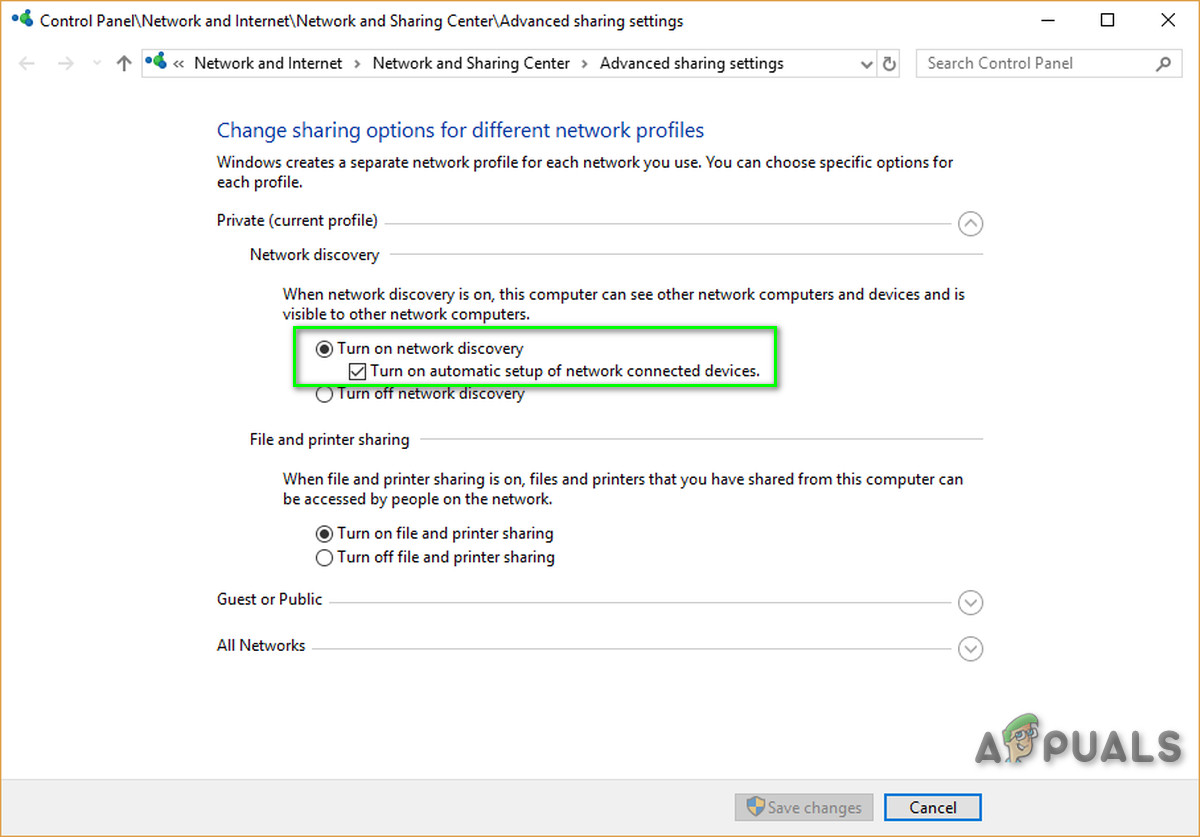
Turn On Windows Discovery - Click Save changes
- See if the problem is solved
- If not then go to Method 1 and go to Network on the left to see if your router is visible there and continue from there.
Method 5: Port Forward
If no UPnP option is available to your router, then the best option is to use port forward.
- Visit portforward.com, select your router model.
- Select the game you are interested in and read the instructions and note down the default ports of your game.
- Visit your router's homepage by entering your default gateway IP address into a web browser's search bar.
- You'll be prompted to enter the username and password for your router.
- On your router page, locate thePort Forwardingsection on your router's homepage. It may be underadvanced settings. Check the router's manual for help if necessary.
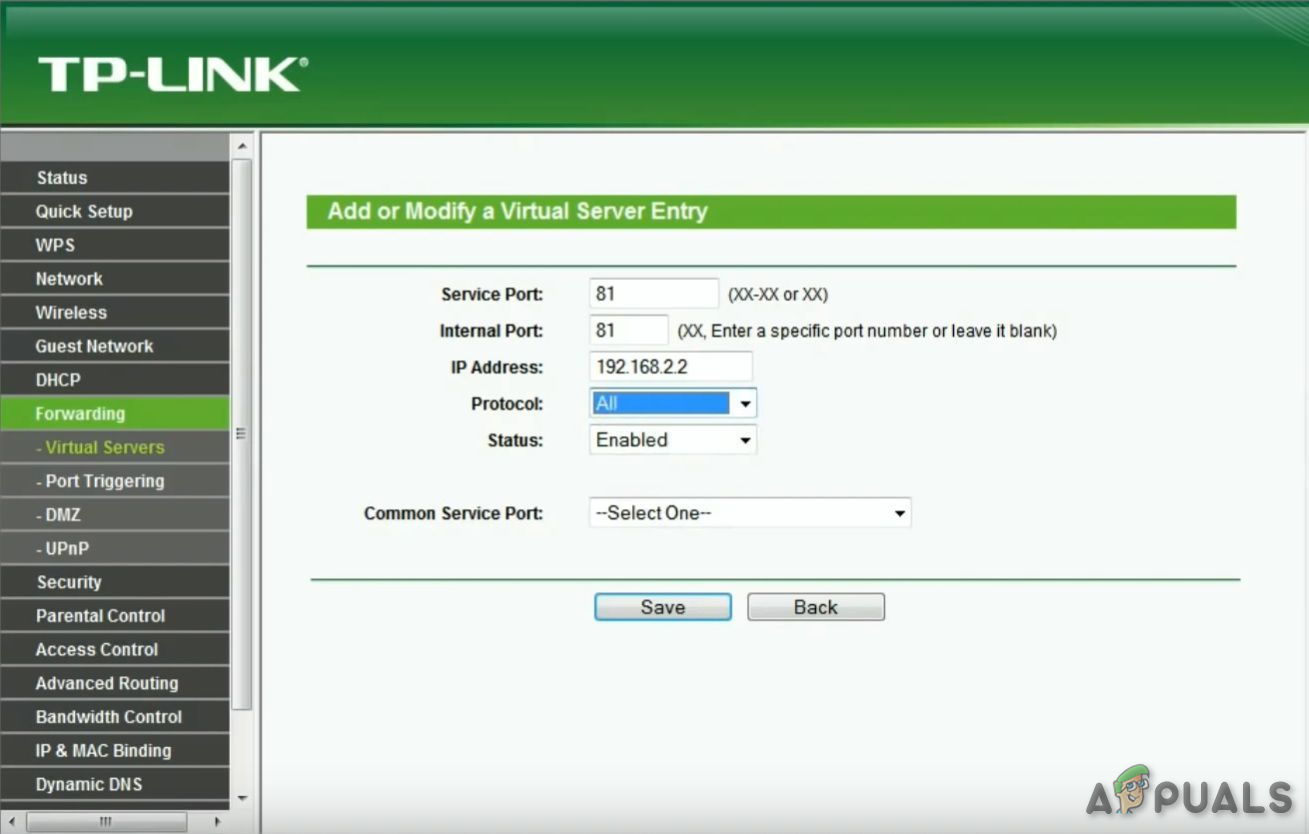
Port Forwarding - From here, you can set up rules for port forward. Depending on your router, you might have to select a button that saysAdd or something similar to proceed. Name the rule as per your likeness.
- In both port fields, enter the default ports of your game.
- Enter your computer's IP address in theIP Address Also, enter the IP address as the Output IP or Server IP for the port forwarded, which tells the router which system to point at.
- Select both theUDP & TCP
- Click Save orApply and reboot.
Method 6: Setting DMZ
This method is not recommended due to the security concerns related to it.
- Open Command prompt.
- Enter "ipconfig".
- Note down your IP address and default gateway.
- Enter your router by entering the default gateway into your browser.
- Click 'Services'
- Click DMZ (demilitarized zone)
- Set your DMZ IP (enter the IP address of your system)
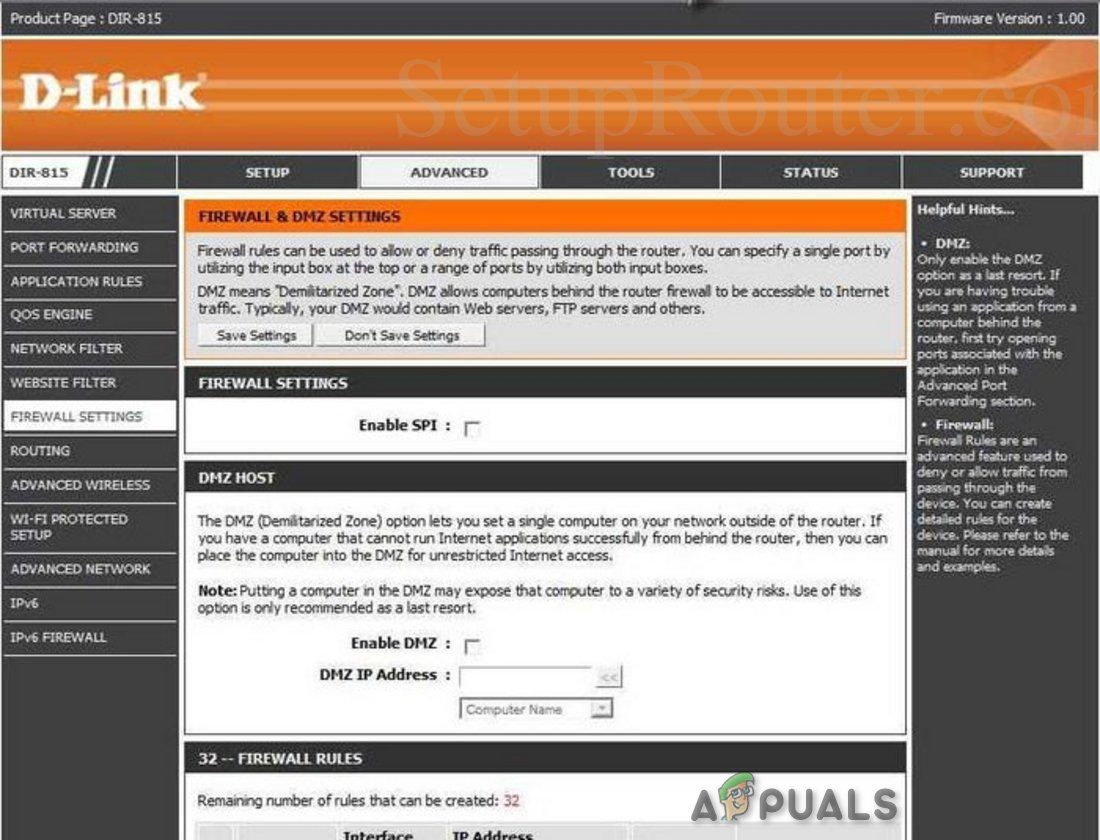
DMZ Settings - Save settings and exit
- And see if it has started to function.
Remember that whenever the IP address of your system changes you have to change DMZ IP as per the IP of your system.
Method 7: Consider Using a VPN
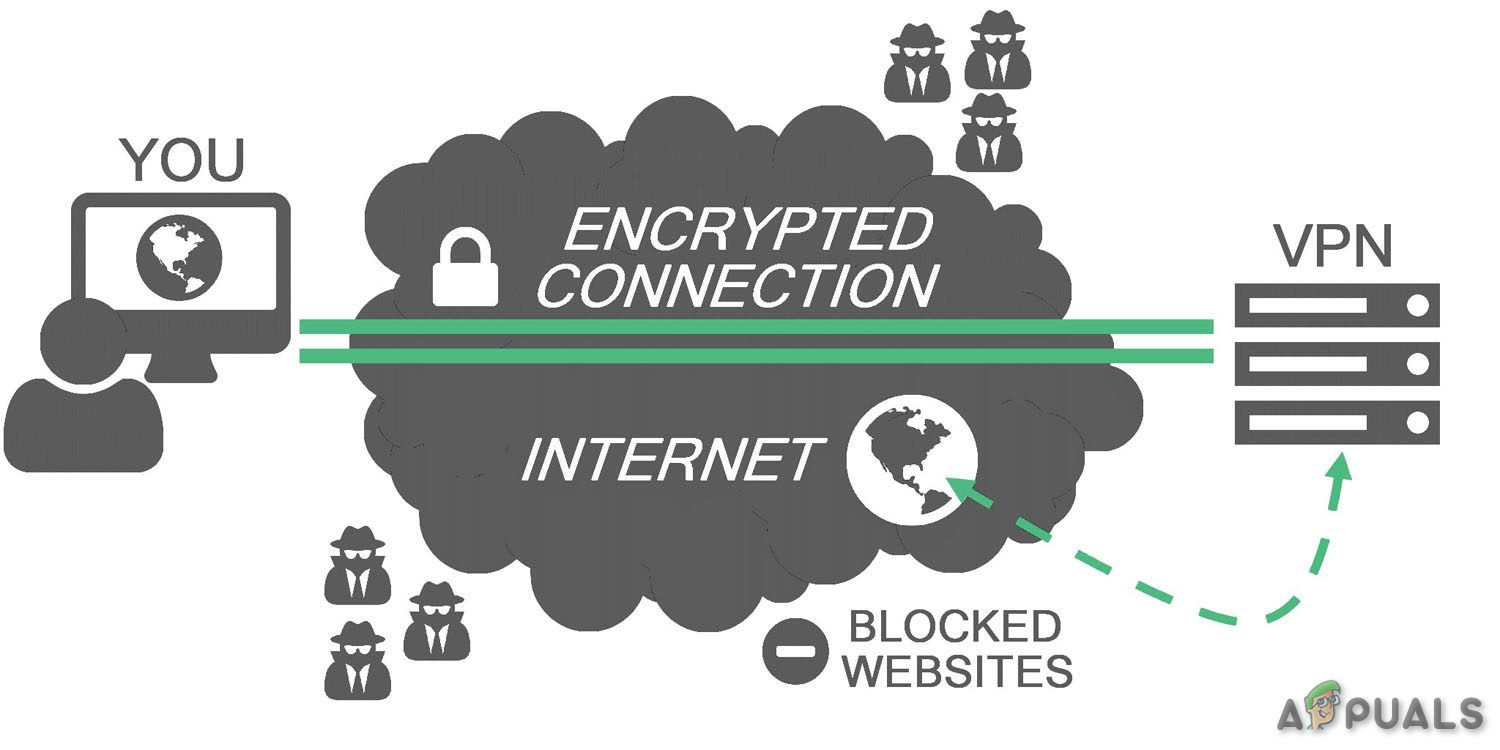
VPN stands for Virtual Private Network and is a kind of special network that includes the computer and the host VPN server. A VPN gives you the ability to bypass the firewall on the NAT altogether because all of the data that leaves your computer is encrypted, and your physical network won't recognize it. NAT restrictions won't apply. And A VPN makes it impossible for the ISP to see your traffic and impose port restrictions. All of the VPN traffic goes through open predefined ports.
![]()
Kevin is a dynamic and self-motivated information technology professional, with a Thorough knowledge of all facets pertaining to network infrastructure design, implementation and administration. Superior record of delivering simultaneous large-scale mission critical projects on time and under budget.
How to Change the Nat Settings on a Router
Source: https://appuals.com/how-to-change-nat-type-on-pc/
0 Response to "How to Change the Nat Settings on a Router"
Post a Comment